
Wainscot Paneling - DIY!
- Chelsea Stolte

- May 9, 2020
- 6 min read
Hello Everyone!
This is the look of "I don't give a sh*t what my hair looks like.. I am getting down and dirty today!" You have probably also learned I do not like shoes. By the way, a truck with that little window in the back is ESSENTIAL for long molding and wood! :) I hope everyone enjoys the tips and tricks I learned doing this.

I accidentally made a trip to home depot to browse last week and ended up making runs to 3 different home depots to get all of my supplies for this DIY project. Once I get knee deep in something I can't stop! So anyways, my kitchen is now paneled AND I learned how to properly apply caulk. I have a great story about how I forgot to poke a hole in the top and it all burst out the bottom.. fun stuff! Hopefully some of my tips and tricks help you!
Just a quick note: the 6 pack costs around $13 each, and the base molding kit was $15 per.
For my kitchen I bought 3 base molding kits and 6-7 6 packs. Totaling at just $136! Be mindful that the boards and molding are only primed, and you will need to paint, technically you could paint before then go back and fill in the holes but I just hung it all up and then painted.
Supplies List:
1. Chair rail and floor molding combo kit - Friendly advice, they wavy one goes on TOP, AKA the chair molding.
2. Your choice of paneling (I chose the ones the snap together and were in a 6 pack)

3. Nail gun! I bought a kit from home depot a couple years ago that has the tank and the nail gun included. Don't forget to buy the nails you need for whichever model you have.
4. Miter saw / Circular saw/ Jigsaw- If you don't have on you should definitely invest in these for DIY projects. This was my birthday gift!
5. Semi-Gloss white paint (or any color you choose)
6. Latex paint brush(s) / roller if you want to roll on the paint
7. Brush baggies!!! They are my favorite... you can always make one with a ziploc bag!
8. Wood filler - interior
9. Putty knives
10. White caulk
11. Caulk gun
12. Pencil
13. Painters tape
14. Patience
15. Paper towel
16. Screw driver (to remove power outlet covers)
17. Knowledge of moving a power outlet - wooohooo the shocks are NOT FUN!
18. Safety glasses
19. Power drill / circular bit - this will be helpful to start a hole for your power outlet... this is just an example, you will want to get one that makes sense for you.
20. Drill bit kit for starting new mounting hole(s) for the power outlet
That's it.. I think ;)!
Installation:
Step 1: Whip out your super heavy miter saw! Get cutting. The floor moldings will be first. You need to do this because the panels will slip into the groove at the bottom. DON'T FORGET the wavy molding is your chair molding and the one with a thicker square shaper is your floor molding. I was just giving a example video BUT ladies... and men... wear your hair in a ponytail :)
NOTE: You will be easily confused for the first few cuts if you have never done molding.... especially since you are making 45 degree cuts and have to butt boards up together. My note to self is always this: OK, so we are doing an inward corner, we WANT TO SEE RAW WOOD and vice versa you DON'T WANT TO SEE RAW WOOD for pillar type corners.


Step 2: Install the floor moldings BUT only put a couple of nails in. You will need your nail gun for this! You will need to have a little flexibility so you can slide the boards into the groove.


Step 3: Start sliding the panels in, and snap them together. The little grooves are sometimes bent, so a flathead screwdriver can help you make the groove larger. Be careful about prying too hard or else it will crack. While you are installing... I put a SINGLE nail in with the nail gun, to gently hold in place and so if I messed up down the line it would be easy to remove.
NOTE: If you have a lump in your wall... like I do.. I ended up with this, but it was because it is being bowed outwards due to the shotty home builder.

Seams didn't line up
Step 4: Continue until you need to make a cut, specifically for the corners. I used a circular saw and my flower planter to hold the board down ;) had to be creative. Don't forget your safety goggles!


NOTE: If you have an uneven wall you will have a gap.. but DON'T WORRY that is what the caulk and wood filler is for (Yes I know ... My molding is too low here... the wall just is uneven and awful and had no way around it).

Gap that was filled in later on
Step 5: You will want to cut a hole for your power outlets, we used the power drill and circle bit to get the hole started and then a jigsaw to cut in between the holes. This is helpful with the jigsaw since it needs to be flush and through the wood before you start cutting (I also learned how to use this the day I cut out these outlets... ha ha...another gift from last easter I finally used).

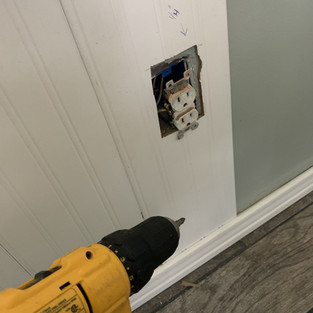


Step 6: Pull out your power outlet: I did not pull the whole box, I just pulled the actual outlet, and then screwed it directly into the paneling (There are 4 holes/screws... or at least should be). Please please please turn off the breaker in the power box when you do this. Otherwise .....ZAP!!!!!! OUCH!
Yes, I know my power outlet looks trashed... might replace in near future.. it sure is ugly!

After you are done put the cover back on. I actually went and bought some super cool covers with lights underneath #Amazon!
NOTE: The lighted power outlets are super easy to install they literally just clip in / on the sides and it provides power to the light underneath. It has a sensor so it is only on when dark :)

Step 7: After you have all of your panels installed, you will want to cut the upper chair molding and install. Note that there is a side with a slot, and that is where your panels go in.

Chelsea.. once again in her SOCKS!!!
Step 8: Go back and nail a few nails per panel, and then set the cut molding on top.. you might want a second person depending on how long of a piece you cut. Once again, don't mind the spots where there is a little gap between molding and the panel, you can fill that in later.
Step 9: Wood Filler / Caulk. This step is completely up to you. I filled in a gap by my window with wood filler and then another with caulk. This is where your putty knife will come in handy. Just make sure to push the caulk or wood filler deep in the cracks so it looks good.
Step 10: Fill in nail holes from nail gun. I used my finger to take a tiny bit of wood filler and ran it across the holes. Make sure you do this on the moldings too... and I know it is icky, just keep a paper towel around and rinse your hands once in awhile.

Step 11: I am not sure if you are supposed to caulk first and then paint or vice versa... but in this step I taped everything off and painted first. Like I mentioned before it might be helpful to at least paint your moldings before installing because it's kind of awkward to put painters tape on your floor after.... never said I was normal. I did two coats of paint, first coat with a brush and second with a 6" roller. Depending on what look you want... the brush gives nice strokes while the roller kind of gave the paneling a textured look.
Step 12: Caulk your moldings. I am not going to lie. I have always sucked at this, but I finally figured it out. Don't forget, you want to caulk the TOP AND BOTTOM OF THE chair molding, and the top of the floor molding. In addition where the moldings meet each other in the corners!


If it is your first time caulking, here are some pointers:
- You want to snip a SMALL SMALL SMALL hole ON AN ANGLE, but big enough that when you start squeezing it can fill the seam you are working on.
- Make sure you use the tool on the gun to poke a hole (unless you want it to gush out the other end due to pressure)
- You DON'T need a lot at all, because you will go back with your finger and smooth it out, which in turn makes it WIDER. My TIP: USE YOUR PINKY FINGER.
- A wet sponge/rag or dry paper towel is a great backup if you need to wipe up a mess.
- Worse case scenario, you can always let it dry and then cut out and re-do.
Step 13: (Optional) Paint your caulk. I did not, but if you went a little high on the caulk you can always touch up with the paint of your wall. This is ASSUMING you purchased the PAINTABLE caulk.
Feel free to message me with any questions and stay tuned for my wallpaper DIY!
Hope everyone has a wonderful Mother's Day this weekend!
Take care,
Chelsea


Utilize a blend of a balance of refined white vinegar and extra-virgin olive oil Wood furniture Cleaner. Utilize a delicate fabric to rub the blend with the wood's grain and afterward clear off with a spotless material.