
Large Profile Tiling - Kitchen
- Chelsea Stolte

- May 3, 2020
- 9 min read
Updated: May 6, 2020
Can anyone tell I LOVE Home Depot?

Figure 1. Chelsea Grouting Her LAST Tile (WHEW!)
Okay, so this was my LEAST favorite project in the kitchen. It wasn't hard but it sure was time consuming. I swear I only cried ONCE the second day in. Don't let me scare you, haha. My future hubby and I tackled this in about 3.5 days (this included installing the lower cabinets / plumbing as well). I would suggest minimum of two people to do this if you want it done quickly, especially when it comes to having to cut tiles, re-cut.. re-lay tiles... etc.
Figure 2. Chelsea The Second Night In
Some advice before you start:
1. If your house was built before 1980 I would make sure you do not have asbestos floor tiles. I had some weird red flooring and black tar looking stuff when I ripped up a corner. It was a complete mess. I never actually checked for asbestos, but we were able to tile over the original sticky tiles. We DID remove the linoleum that was on top.


2. Don't bother painting your walls until after you tile. I nicked mine up pretty good and later found mortar smeared in a few places.
3. Start tiling from the middle of the room, or else this happens.... Your grouting gaps will get wider.. This is a "Chelsea Special". My excuse is due to having to work from under the cabinets first... hopefully you don't have to do that.

4. DON'T DUMP GROUT OR MORTAR DOWN YOUR SINK
Onto the supplies, I will put examples in of what I personally used underneath each. If you are using smaller tiles for example, the mortar and the trowel you want will be different. I am basing my supplies off of large profile tiles.
Supplies List:
Tools
1. Wet tile saw OR manual cutter (smaller/non-complex areas)
**I would get a second blade while you are there**
Ryobi 13 Amp 8-1/4 in. Table Saw
2. Impact drill
3. Corded power drill
4. Mortar mixer
5. Grout float
6. Grout sponge(s)
7. Rubber mallet & a wood block
8. Level
OR
9. Tile Trowel
10. Knee pads (unless you want to have bruised knees.. haha)
11. Box of latex/nitrile gloves
12. Chalk Line (I never used this because I wasn't able to start from the middle of room- but you will want to research how to do this)
13. 2-3 Home Depot bucket(s)
14. Circular Saw
15. Eye protection
16. Paint stirring sticks (for mixing grout)
17. Fine sand paper (you will thank me later)
18. Palm sander or any sander really(can help with leveling subfloor)
19. Scoring tool - OR you can pull a "Sam" and go through a ton of SAWZALL blades.. haha
20. Measuring tape
21. Pry bar
22. Face Mask
23. Pencil for marking tiles
24. Clorox bleach - for possible mold under floor
25. Painters tape
Materials
1. Cement board - DUROCK/HARDIE either 1/4" or 1/2"
DON'T GET THE EDGE GUARD - IT SUCKS AND BREAKS APART
2. Cement board nails - ROCK ON: Choose the ones that are long enough to go through your backer board, and into the actual floor joists.
3. Plastic tile spacers - You can choose how thick the grout will look with these.
2. Cement tile - I put the link to the tile I used.
3. Mortar/Thinset - If you are using smaller tiles, check to see what mortar/thinset to use. For the larger profile tiles I used this:
5. Grout - I chose black, you can choose white or gray as well.
4. Schluter - You need this to transition between flooring/carpet to the tile. There are multiple sizes, you will have to choose based on your tile choice. Example:
5. Transition schluter - This I had to use because when I installed the cement board it was actually higher that the floor I was butting it up to. You have to order this special through home depot/lowes. That was a super fun day of running around trying to find. IF you need this, there is a cool place in Sterling Heights, MI that have it in stock. It is called The Tile Shop. ALSO THEY HAVE ALL THE TILE IN THE WORLD THERE. IF you hadn't chose yours yet.
Preparation - Day 1
1. Remove all floor moldings.
2. IF this is a kitchen, obviously remove all the cabinets IF you are replacing .. otherwise you can just tile up to current cabinets. I might as well say it now... Make sure you TURN OFF YOUR WATER before you disconnect everything. Luckily the only thing we had to replace was a valve after tearing this all out. HAVE BUCKETS HANDY. Also.. there is WATER in the dishwasher hose... not fun when it splashes all over you. In addition, make sure you TURN OFF YOUR GAS if you are removing a gas range.


3. Remove things from your walls of the room you are tiling. The banging when you start ripping floor up is NO GOOD for your precious decor.
4. Take out old flooring - I would suggest taking a circular saw and cutting sections so it is easier to pull up linoleum. The circular saw DOES have a setting of how deep you want to cut, just look for it. I used a pry bar and a mallet (a hammer will ruin your hearing.. don't do that!) to get the first corner up and going. Make sure there is no sign of asbestos. If you think you do, and are not in a rush, there are local laboratories where you can bring a sample of your flooring and I think it was around $60 to have a single sample tested for asbestos.


5. Check floor for signs of damage and replace subfloor where needed.
6. After everything is up, you will want to make sure the floor is level. If there are any major deviations this could affect the cement board AND the tiles can come up. My suggestion is to take a sander if you have spots that are just a little off. IF you can remove all of the old flooring down to the subfloor that would be the BEST. But we did not.
7. Now is the time to fix the squeaks in your floor, you want to find your joists and screw down proper length nails to reinforce the subfloor.
8. Once you've confirmed it is level, get your cement board and scoring blade out!
9.Measure and cut your cement board - Do NOT butt the boards up together. You leave around a 1/8" space. (I had already put them down after I was told NOT to butt them up.)


10. I'm not going to lie, apparently you are supposed to put thinset UNDER your backer-board. You will have to do more research if you plan to do this.. because I did not. I do know that the whole point of doing it is to fill in any voids or pockets between the subfloor and the board itself.
11. Install your backer-board with ROCK ON screws, I would use your impact drill for this. The container SHOULD have the star bit inside. You want to drill from the center out, and then do a line all around the board. I'd say 12" apart at most. I found some recommendations to leave the board 1/4" away from the walls.
12. Go back and make sure this is also level, and take a sander to any parts that seem a little high. You can always build up the mortar if it is too low.
13. Day 1 Complete!
**PRO TIP: PUT YOUR COFFEE MAKER IN YOUR BEDROOM FOR FOLLOWING MORNING... HAHA***
Installation - Day 2
1. Wake up early.. and un-package your wet-saw. The one listed took a little time to put together and I had to watch a youtube video. Please see attached videos for some comments on the wet-saw!
2. I cleaned the wall behind old cabinets and painted the color of the kitchen, you don't have to but I was not sure if my new counter and backsplash would cover.
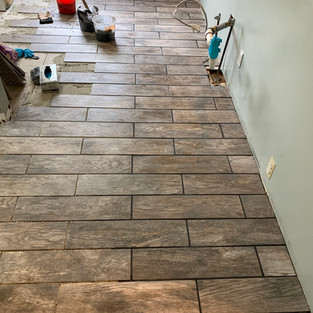
3. Start laying out tiles with your plastic spacers....it was helpful to number the tiles. Unfortunately like I mentioned before I had to start from the wall out because I had a tight timeline and needed to install those cabinets back in ASAP. You will want to research the chalk line tool to do this.
You will quickly notice which tiles are going to be problematic if they are not laying flat, make sure you are fixing this as you go, otherwise like I said you can always build up a little mortar if something is too low. If you are transitioning flooring and it is higher or lower you need to buy the transition schluter. YOU NEEED TO MEASURE YOUR TILE THICKNESS SO YOU CAN CHOOSE THE CORRECT SCHLUTER. Also!! if you have another opening to the room (in this case my stairs) you will need the original schluter as well to put the tiles in.


It's tiling time!
***You will need your bucket, bag of mortar, trowel, water, drill, knee pads, a will to live, and a mortar mixer.***
- As told by my wise friend, you want to mix small amounts of mortar, as it will dry quickly in the bucket. The mortar should have a peanut butter consistency, if you put some on the trowel and it doesn't fall off (liquid) then you should be good. You also do not want it dry, hence the "peanut butter" comparison.
- The technique: (see youtube video for more in-depth information - this is where I learned)
- You will want to make enough mortar to do a couple rows at a time. As mentioned start from the middle of the room - you would have had to researched the chalk line.
- If you have to use transition schluter, don't forget to put mortar in it as well. Then you will butt your tile up in it. It might move a little from when you originally measured so be careful!
- WEAR WORK GLOVES!!!! It will save you from blisters! I only got one small one luckily.

- For large profile tiles you want to trowel the mortar the opposite way of the tile: See pictures below.


OK. Onto laying your first tile:
1. Complete a row or so of bed mortar. This is done using the trowel with strokes opposite of the tile length. Make sure you have all your tiles ready to go, it starts drying quite fast.
2. Lay your fist tile, gently set it in place and push down wiggling it enough for it to set. You will know if you laid too MUCH mortar if the mortar squeezes up between the tile cracks.
3. Recommendation: If you want you can use a mallet and a piece of 2x4 and pound down as well to reinforce, you can. I did it for part of the tile... up to you. I saw it in the trowel and error video above.
4. Do NOT forget the schluter if you have another opening, such as the staircase in my house.
5. Continue laying tiles until it is 9pm and you break down crying and plop in bed.
Installation - Day 3
I just tiled all day, make sure you wait 24 hours before you start grouting!!!!
Grouting - Day 4
Technically I came back and grouted the rest of the kitchen later on that week.. just needed to get the kitchen cabinets installed and the counter top measured :)
***You will need: grout float, small bucket, stirring stick, bag of sanded grout, grout sponge(s), water buckets(s), latex gloves, knee pads.***


Are you ready to finish?!
1. Find a spot where you can dump grout water (NOT DOWN THE DRAIN)
2. You have to concentrate and devote time to this, if you leave the grout sitting on the tiles too long you will have a permanent haze. NOT COOL!
3. Mix a SMALL amount of grout, this also will dry up pretty fast. It needs to be peanut butter consistency as well. My advice is to use a solo cup to measure grout and water. I found one solo cup of grout and a 1/3 cup of water did the trick. You can make bigger batches once you figure out the consistency and you become faster at grouting.
4. Grab your float and coat one side with the grout. You will want to push grout into the tile seams at a 45 degree angle. Don't be afraid to get grout on the tiles.. it will happen, and you rub off anyways. I would recommend the rubber float, the spongey one sucked! I used it in my bedroom when I tiled and it ripped up my hands.
5. Do a SMALL area, see first picture above. It is a pain to keep up if you do too much at once.
6. Grab your bucket(s) of water, you will want to come in with the sponge and do a circular motion, this helps set the grout. keep doing this until you remove residual grout on the tile. Be mindful that you will have to come back and wipe probably 2 more times to keep it from forming that haze I mentioned. Continue grouting remaining tile, and make sure you go back and check the tiles you did a few minutes before. You will just want to wipe the surface of the tiles, don't touch the grout anymore.
7. That's it!! You can walk on the tile lightly, but recommend 24 hours as well before you start heavy traffic or moving furniture back :)
Thanks for reading! Feel free to message me with any questions.. OR pictures of your project!
****Please note I am not a licensed contractor and everything in this post was based on my own experience and research. IF you are unsure of something, please reach out to a professional. ****


Comments